Documentation
Navigate this page using the links below.
Getting Started with Whimsy
About Whimsy Maps
WHIMsy (World Heat & Impact Maps) is a choropleth mapping tool that shows concentrations of locations or activites across a region. Whimsy Maps was developed by the GSE IT Team at the University of Pennsylvania's Graduate School of Education (Penn GSE).
Our Story
Whimsy Maps began with the desire to track Penn GSE's impact in Philadelphia schools. The Graduate School of Education at the University of Pennsylvania has partnered with the School District of Philadelphia for decades to improve the academic achievement and life outcomes of Philadelphia children and youth. Penn GSE plotted consultation, leadership, professional development, research, service learning, student programs, and training programs implemented by their different groups across the city. The searchable Penn GSE in Philadelphia map offers a snapshot of the many ways that Penn GSE students, alumni, faculty, and staff are answering the call to action and service - in schools in every single Philadelphia catchment.
Building Maps Made Simple
Whimsy Maps is a streamlined tool that can be used by both individuals and corporations for a variety of purposes and audiences. Individual & enterprise account options provide solutions for everyone, from a single researcher to an entire school. Creating maps can be a collaborative effort since the app has several roles built in to grant and limit access as needed. Nearly everything within the tool is customizable, creating infinite possibilities as far as what kinds of content can be displayed.
Whimsy Maps pares down and visualizes the map-making process to make it as simple as possible. A user can create a map in minutes, though the platform is flexible enough to create maps for wide range of applications. Any location can be mapped; the tool provides a set of pre-mapped areas, along with the option to upload maps. Branding and customizing is easy with a real-time visual editor. Users can add data through the online tool, or bulk upload using our template. The product intends to remove much of the unnecessary decision making that makes its competitors bulky and hard to use.
Back to TopCreating a Whimsy Map

Initial Setup
- If you have maps available, you will see a Getting Started tile on your Dashboard. Select Setup Map to begin.
- If you do not see a Getting Started tile, you will either need to purchase additional maps (individual) or contact the Account Owner (enterprise).
- Individuals and Account Owners: click the Add New Maps button to purchase additional maps.
- Next, select your map’s geographic location by choosing or uploading a GeoJSON file. In Whimsy Maps, GeoJSON files are the data representation used to represent the relevant regions you'd like to display in your Whimsy map. You can choose from our list of GeoJSON maps or upload one of your own. Read more about GeoJSON.
- Next, give your map a Name. This Name should reflect your map’s purpose.
- Your Map URL Path should be a simplified version of your Whimsy Maps’ Name. This will be what is shown in your web browsers address box.
- Optionally, add a short Description about your Whimsy Map.
- Save to continue.
Using the Visual Editor
If you’re coming from the Initial Setup, you will be greeted with a pop-up ‘Getting Started with Your Map’. This provides guidance about using the visual editor and next steps to complete your map.
Click Start to begin editing your new Whimsy Map.
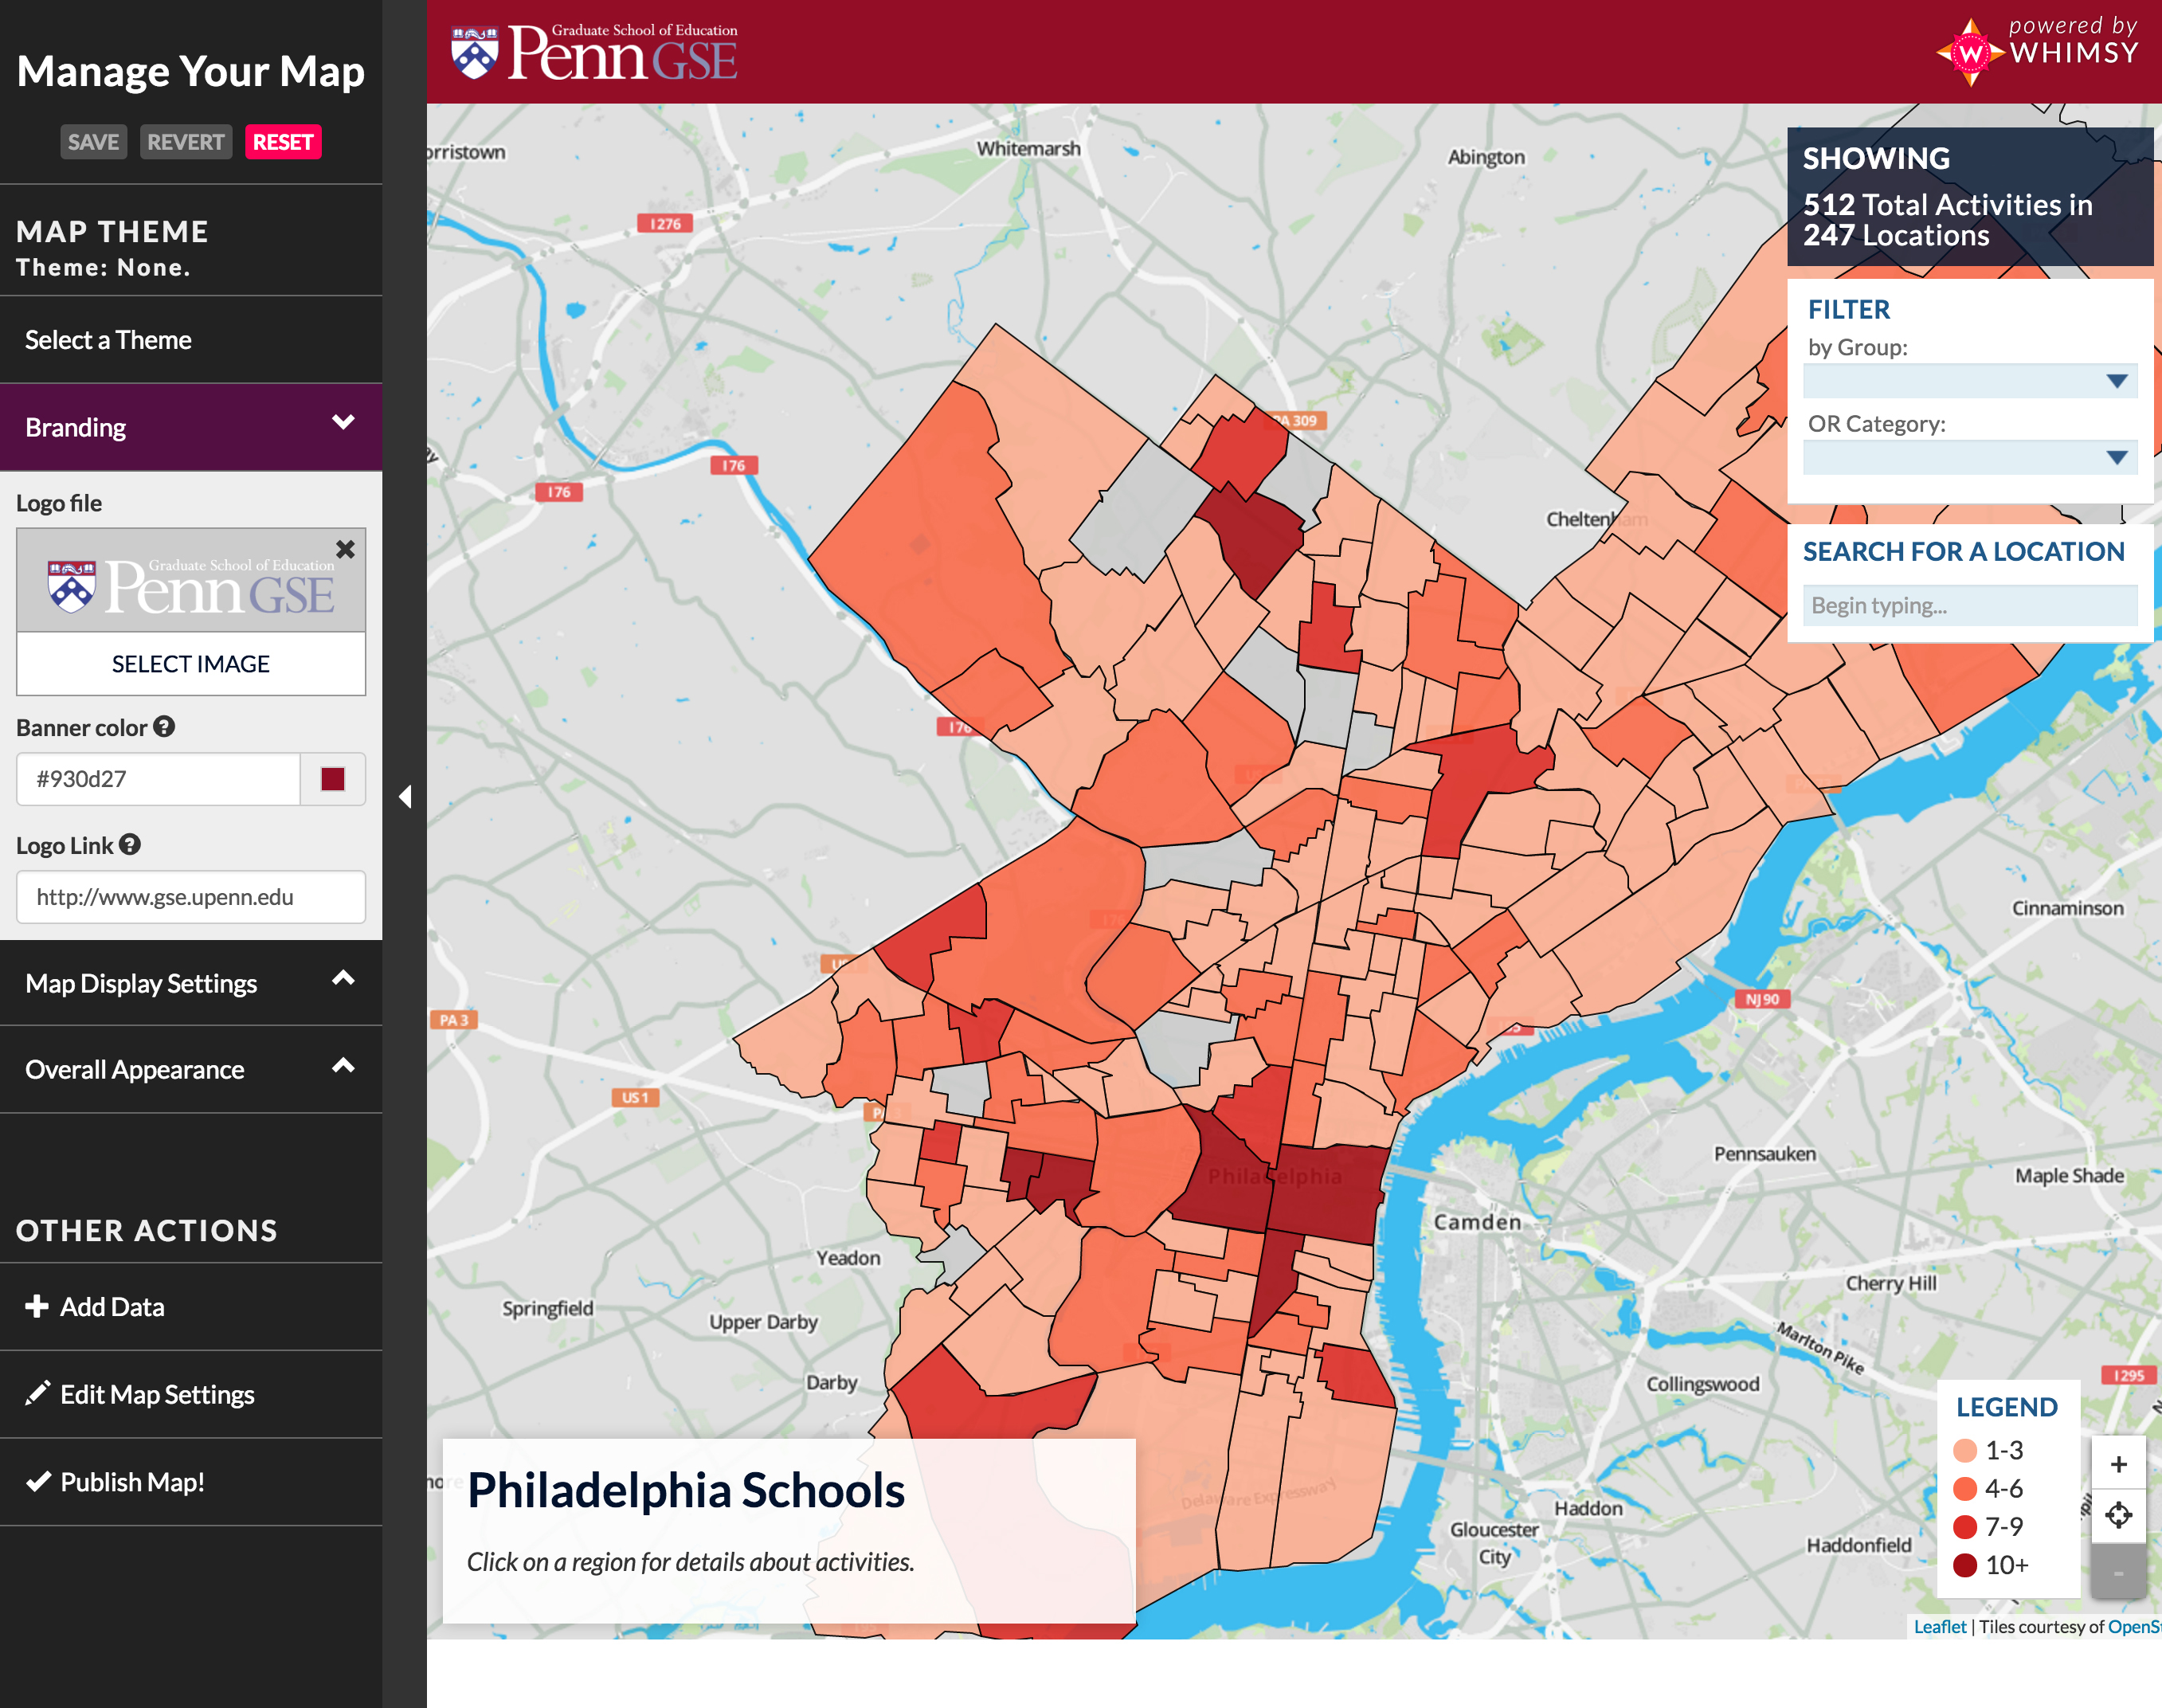
Manage Your Map
- Use the Manage Your Map menu on the left-hand side to change the way your map looks.
- When choosing colors using the Manage Your Map sidebar, use the icon next to the label to see which colors will change on the map itself.
- The Manage Your Map sidebar will not appear for those assigned to the ‘Read Only’ user role.
Select a Theme
- If your account has available Themes, you can view and apply them here. Applying a theme will change visual aspects of your map.
- If your account does not have available Themes, you will not see this item on the Manage Your Map sidebar.
- Depending on how the theme was built, the other tabs/options in the Manage Your Map sidebar may disappear upon selection of a Theme.
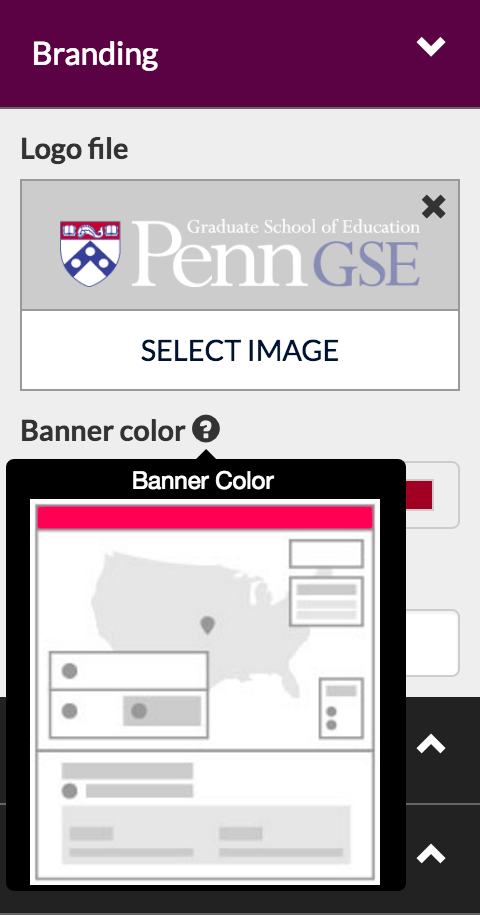 Branding
- Logo: An image file approximately 200x50px will work best in this space.
- Banner Color: Hover over the icon to see where your choice of color will appear on the map.
- Logo Link: Add your website’s link here to turn your logo into a link.
Map Display Settings
Map Marker Color:
- Markers define the locations on your map.
Map Background:
- Preset list of options that change the background appearance of your Whimsy Map.
- These do not change or disable any other styling options.
Map Outline Color:
- Outline map regions.
Legend Details:
- Ranges: Here you can decide how to represent concentrations within regions. Darker areas represent highly populated locations.
- Colors: Choose the color palette for the regions of your map.
Min/Max Zoom:
- Zoom in or out to show the user the most relevant parts of your map.
Show Map Markers by Default:
- Checked: All of your location markers appear when viewing your map.
- Unchecked: Your location makers only appear when a user clicks on a region where locations exist, and only that region’s location markers appear.
Overall Appearance
Many of the colors on your map are customizable. Hover over the icon to see where your choice of color will appear on the map.
Other Actions
- Adding Data: See Adding Data.
- Edit Map Settings: See Editing Map Details.
- Publish Map: See Publishing & Unpublishing Your Whimsy Map.
Adding Data
You can get to the Map Data screen in one of two ways:
- From the visual editor: on the Manage Your Map sidebar, under Other Actions, select Adding Data.
- From the Dashboard: select Add Data to Map from the Map Settings menu on your map.
Add Locations
Locations are points you'd like to include on your map. You cannot add an activity without first adding a location for that activity.
To add many locations at once (Bulk Upload)
Import many locations at once along with their respected categories and websites. Add location data to your map first, so that you can link activities to the locations.
- Click the Locations Menu > Import Locations
- Download the template file to use to import the data locations.
- Enter your location data, staying true to the format of the template file.
- Choose File to upload the file to Whimsy.
- Click Upload & Import and your locations will be added to your map.
To add a single location
- Click Add
- Enter the location’s:
- Name
- Category
- Website
- Location Details: Enter either the Latitude/Longitude coordinates or a standard address
- Click Submit
Add Tags & Filters
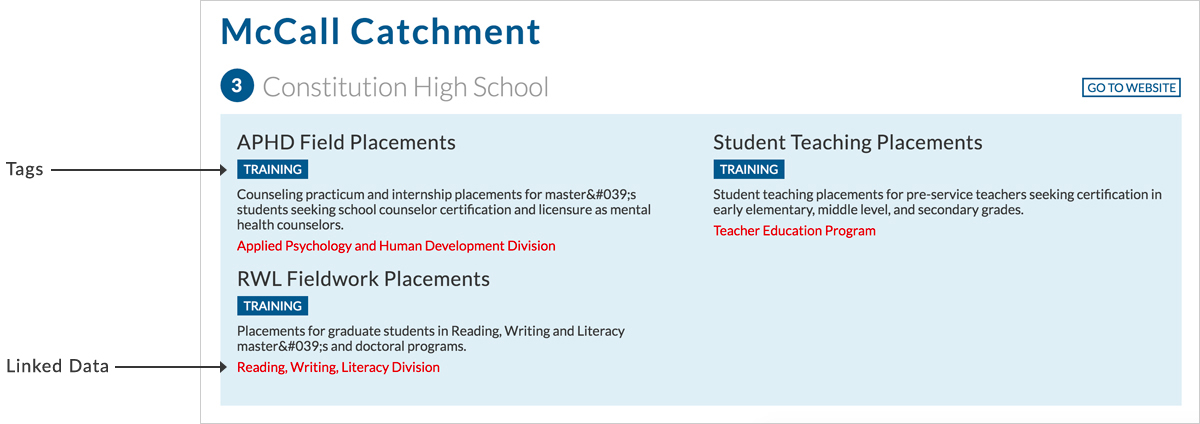
Tags and Filters are a way to categorize your activity data. They can be used to mark activities with groups of tags like "Topics" or link activities to specific groups or members of your organization.
Setup Map Tags & Filters
- Click Add Filter Group
- Name/Label for Filter: Enter a name for your tag or filter.
- Show Label
- Use as Search Filter
Add Activities
Activities are the main data for your map. Link them with your locations, tags, and filters.
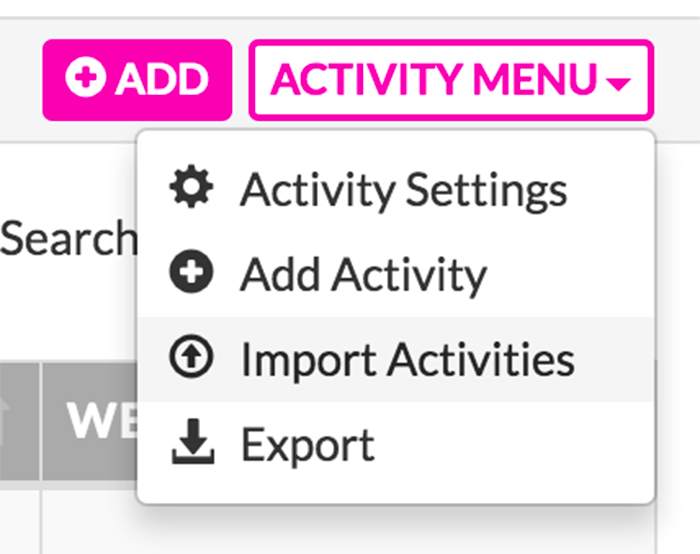 To add many activities at once (Bulk Upload)
- Click the Activity Menu > Import Activities.
- Download the template file and enter your Activities into the spreadsheet. You must know your location names in order to associate activities with locations.
- Enter your activities, staying true to the format of the template file.
- Choose File to upload the file to Whimsy.
- Click Upload & Import and your activities will be added to your map.
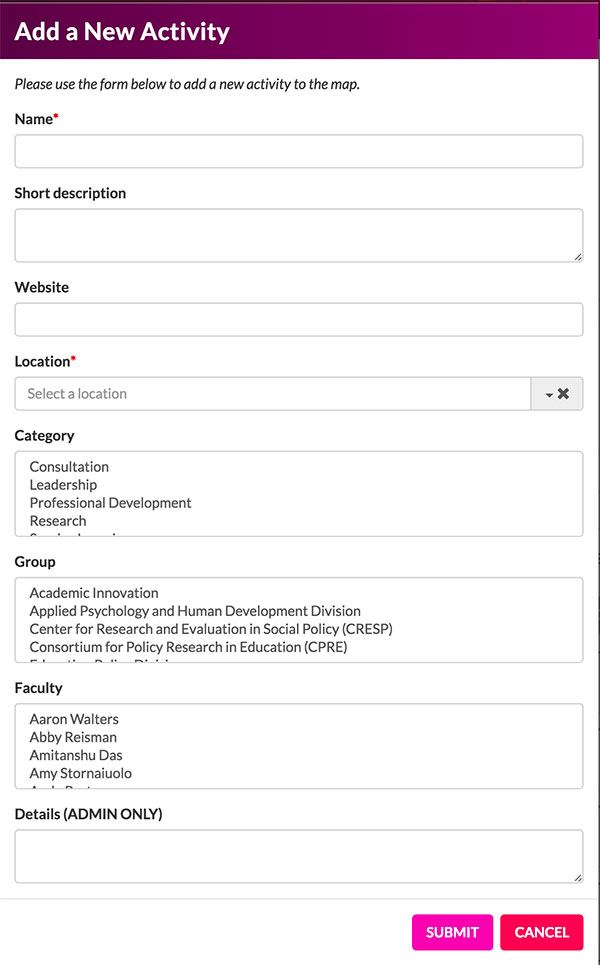 To Add Activities One At A Time
- Click Add
- Enter the activity’s:
- Name
- Short Description
- Website
- Location: associate this activity with a location on your map
- Tags: select a tag to associate with this activity/location
- Details: Admin only
- Filter Group:
- Create a Name for the Filter
- Click an individual Activity and now you will see a section dedicated to Tags/Filters (the name of your tags/filter will show).
- You can select a Filter/Tag to associate it with this activity (eventually having a few will create a group that share one tag/filter)
Exporting Data
Click Export in either the Locations Menu or Activity Menu to export the respective data as an excel file.
Back to TopCreating a Theme
If you would like all of your maps to have the same look and feel and/or overall branding, you have the option to create a Theme. When creating a theme, you can define the Branding, Map Colors & Settings, and Overall Appearance of your maps.
To create a Theme, navigate to the Map Themes tab from the Dashboard. Only some user roles will have the ability to create themes.
The person creating the Theme can choose to include Map Colors & Settings and Overall Appearance as part of the theme. If those options are included as part of the theme, they will be disabled on the map’s visual editor.
- Theme Info:
- Enter a Name for this Theme
- Enable this Theme
- Checked Box: Check this box to allow this Theme to be used.
- Unchecked Box: If left unchecked, this Theme will be unable to be used.
- Branding:
- Map Colors & Settings:
- Cannot edit Ranges
- Refer to Map Display Settings
- Overall Appearance:
Publishing & Unpublishing
Once you or your team is finished editing your Whimsy Map, you must publish it to share it with the world. Publishing a Whimsy Map allows your Whimsy Map to be shared on social media and embedded it on a website.
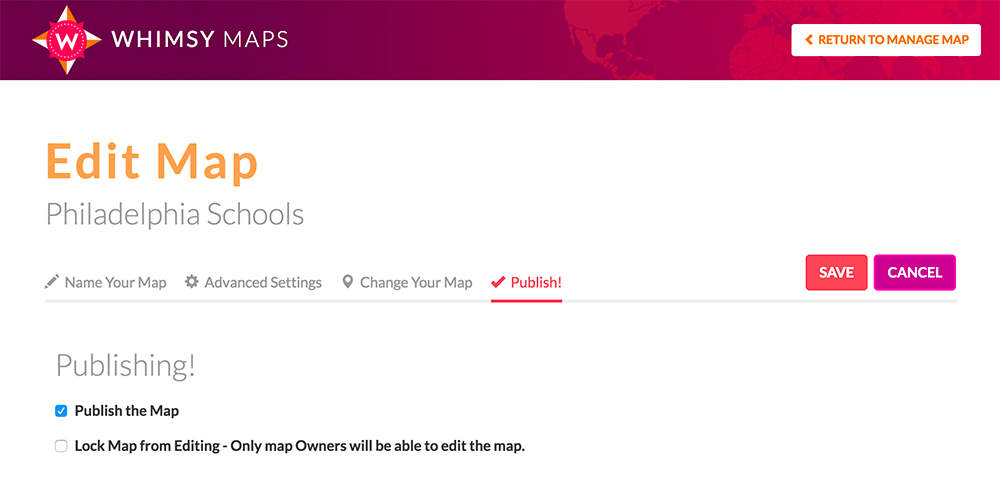
To Publish a Whimsy Map:
- From Dashboard, click on Map Settings > Edit Map Details
- Click Publish
- Check the box labeled Publish the Map and then Save.
To Unpublish a Published Whimsy Map:
- From Dashboard, click on Map Settings > Edit Map Details
- Click Publish
- Uncheck the box labeled Publish the Map and then hit Save.
Editing Map Details
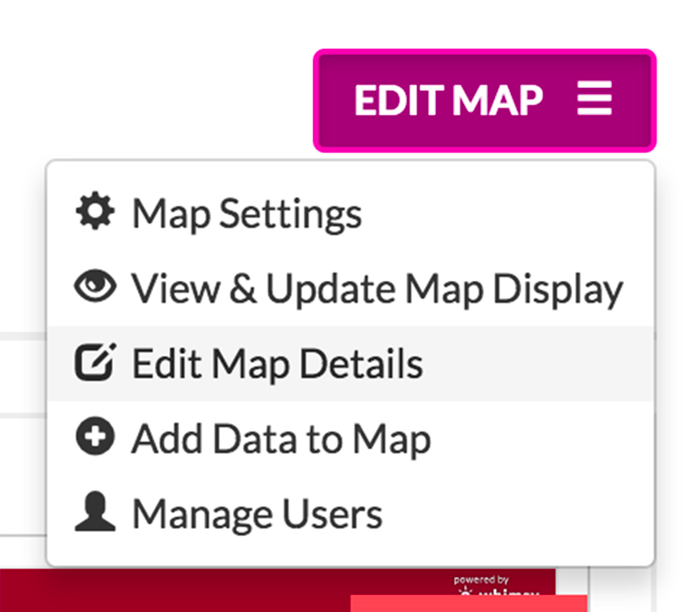 If at any point you want to change the name of your Whimsy Map or change your map’s location, go to Edit Map Details. Starting from the Dashboard, click on the map you’d like to edit, and then use the Edit Map dropdown to select Edit Map Details.
After making any changes, make sure you Save before you move on.
Name Your Map
Change the Name, Map URL Path, and Description of your Whimsy Map.
Advanced Settings
Home Marker
- You have the option to include a Home Marker for your Whimsy Map. This Home Marker is meant to showcase a specific location, usually the home base of your operation.
- To include a Home Marker, enter:
- Home Name
- Home Marker Color
- Home Address: must be in standard format, not Latitude/Longitude.
Display Settings
- This section is especially helpful for those who uploaded their own GeoJSON file. If you used one of the preinstalled maps, the Display Settings are already optimized for you.
- Region Display Name:
- Prepend Region Name with: Text that all regions should be prepended with, e.g. "District", to get "District 27"
- Append Region Name with: Text that all regions should be appended with, e.g. "Neighborhood", to get "Cedar Park Neighborhood"
- Note: You can view sample value by selecting, ‘Click to see sample values’.
- Map Display Zoom:
- Zoom in or out to show the user the most relevant parts of your map.
Change Your Map
Here you can choose to use a completely different GeoJSON map file. If you decide to do this, any and all changes you have made to your map will be deleted, including all Locations/Activities.
Publish
See Publishing & Unpublishing Your Whimsy Map.
Back to TopAccount Management
Account Types
You can choose from two account types: Individual or Enterprise.
Individual
Individual Accounts are for a single person. You have the option to upgrade your account to Enterprise at any time to allow others to join your map.
Enterprise
Enterprise Accounts are for teams.
The Account Owner, or creator, has complete access and can assign each team member a Role with its associated Permissions. Additionally, the Account Owner can Request Additional Whimsy Maps, Invite Members, Create a Theme, and Publish/Unpublish a Map.
The Account Owner is a different role than Map Owner. See Roles & Permissions Breakdown for more information.
Team Management
The Enterprise Account Owner has the ability to invite team members and assign them Roles.
To Invite a New Team Member
- From the Dashboard, click the Team Management tab.
- Click Add.
- Enter a valid email address.
- As the Account Owner, you have the option to create a username for your teammate. Once you create a username, it cannot be changed.
- Click Add User.
To Assign a Role to A Team Member
There are two ways to accomplish to assign a role to a user:
- From the Team Management tab:
- Click Manage Maps in the table for the User you’d like to assign a role to.
- From the Navigation Tabs:
- Directly under the navigation tabs (Your Maps, Team Management…) are two buttons: Click on BY MAP. This table shows all the Maps you own. In the last column is a button called Manage Users. If you select one, you are shown a form with the option Add User. Click Add User and select a user and role for that user in the dropdown selections.
- If you’re in the BY MAP section, you can also Add New Maps here as well. Click Add New Maps located in the upper right corner above the table and under the navigation tabs.
Roles & Permissions
The table below defines the different User Roles and their associated Permissions.
Roles & Permissions Breakdown
User Role | Permissions |
Owner | Owner can:
|
Designer | Designer can:
|
Data Entry | Data Entry can:
|
Branding Only | Branding Only can:
|
Theme Only | Theme Only can:
|
Brand & Theme | Brand and Theme can:
|
Map Settings Editor | Map Settings Editor can:
|
Read Only | Read Only can:
|
How to Change My User Role
Individual Account
You have all roles & permissions assigned to you by default.
Enterprise Account
Only Account Owners can change a team members’ role. Please contact your Whimsy Account Owner in order to change your user role and permissions.
How to Identify My User Role for Each Map
Once logged in you are taken to the Whimsy Dashboard, where you will see all maps in your account. Beneath each map’s title is your assigned user role for that map.
Back to TopGetting Started with GeoJSON
What is a GeoJSON File?
A GeoJSON file is a format for encoding a variety of geographic data structures. In Whimsy Maps, GeoJSON files are the data representation used to represent the relevant regions you'd like to display in your Whimsy map. Without this file, Whimsy will not know how to break your map into regions for display.
Where do I get a GeoJSON file for my map?
Google is the most effective tools for finding a GeoJSON file. Simply search for "GeoJSON" plus the location of your desired map, and, finally, the type of regions you would like to use. For example if you wanted a map of counties of New Jersey, you would Google, "GeoJSON New Jersey by County". Files ending in .json, .geojson, or .geo.json will work.
Below is a list of useful sites to get you started:
- Assorted United States GeoJSON Files http://catalog.opendata.city/dataset?res_format=GeoJSON
- United States by state and county: http://eric.clst.org/Stuff/USGeoJSON
- Assorted Philadephia GeoJSON Files: https://www.opendataphilly.org/dataset?res_format=geojson
- Assorted New York City GeoJSON Files: http://data.beta.nyc/dataset?res_format=GeoJSON
Converting Other Map Data Types to GeoJSON
You can use mapshaper.org to convert some data files to GeoJSON. Drag and drop the file you wish to convert. After the data appears in your browser window, click "Export". Choose "GeoJSON" from the choices.
Helpful GeoJSON tools
- Test your GeoJSON file: http://geojson.io/
- Geojson Builder: https://geojson-maps.kyd.com.au/
- Wikipedia explains GeoJSON: https://en.wikipedia.org/wiki/GeoJSON